How to make your very own sourdough boule from scratch
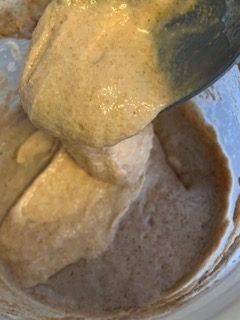
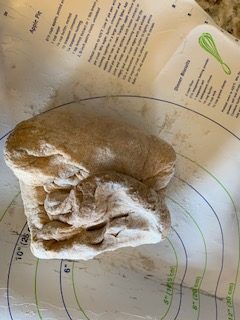
Sourdough bread is more digestible than unfermented breads and a pretty rewarding and forgiving baking project. A lot of friends have been asking me how to make a basic sourdough loaf, so I decided to write it up instead of telling everyone one at a time, as I have been. I’m including lots of pictures that will hopefully help with questions about texture and technique. The following recipe is an amalgamation of a few different recipes I’ve pulled from over the years. You’ll need to have a starter before you begin; instructions for making your own starter can be found here. The King Arthur Flour website is full of great information on how to do all things sourdough, including how to put your starter to sleep indefinitely. If you live close to Seattle and don’t want to wait 1-2 weeks or perhaps have not had success starting your own, feel free to DM me and ask for a scoop of mine. It takes surprisingly little old starter to make a new one. Below is a picture of the texture of my starter: thicker than pancake batter, thinner than cookie dough. You can make this recipe with an unfed starter (that is one you have just pulled out of the fridge, if you’re keeping it cold to slow down the feeding schedule). You will, however, get better rise if you feed your starter about 8 hours before starting this project.
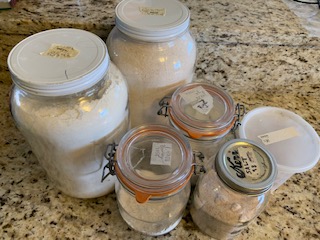
I like to make my loaves with multiple different flours: whole wheat, white, rye, barley, spelt, cornmeal… Any combination will work with this recipe, as long as there is enough gluten in the total amount of flour. This loaf works great with just water as a liquid, but you can experiment with substituting some or all of the total amount of liquid with milk, buttermilk, yogurt thinned with milk or water, plant milk, that liquid that pours off of your whole milk yogurt after it’s been opened and then sat in the fridge… I use organic flours and filtered water to make mine.
You should be forewarned that making sourdough bread is very much done by feel, not so much exact measurements. The below proportions will give a fairly sticky dough to which you will add flour as needed.
First, gather everything you will need to make your loaf:
- 567 g or 3 ½ cups Flour: Whole Wheat, White, Rye, and Barley are my go-to blend, about 1/3 each of White and Whole Wheat plus 1/6ish Rye and Barley. Also consider corn meal, buckwheat, spelt… each gives a different boost of flavor and texture.
- Additional flour as needed
- 9g or 1 ¼ tsp Salt
- 420 g or 2 cups Filtered Water (tap is ok) or substitute (see above)
- 32-64 g or 1/4-1/2 cup of Sourdough Starter*
- Kitchen scale and/or measuring cups
- Big mixing bowl
- Wooden spoon
- Clean dishtowel
- Proofing bowl or basket (any clean bowl that is on the narrow side will work; some people prefer a woven basket)
- 4.5 quart Dutch Oven (you can size up or down if it’s all you have, or use whatever similarly-shaped vessel you have around, but an actual Dutch Oven will produce the best results)
- (*the amount of Sourdough Starter is very flexible, keeping in line with the rest of this recipe. I’ve used as little as 1 T and as much as 1 cup)
Instructions:
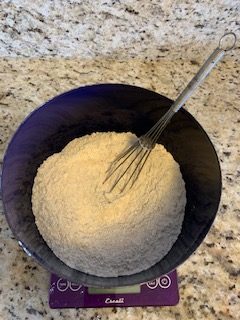
Day One: Mix together the initial 567 g or 3 ½ cups of flour and the salt with a whisk or wooden spoon.
Add 420 g or 2 cups of liquid.
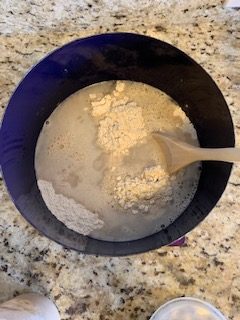
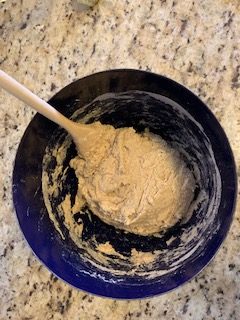
Using the wooden spoon, mix until all the flour is incorporated. This mixture should be fairly sticky.
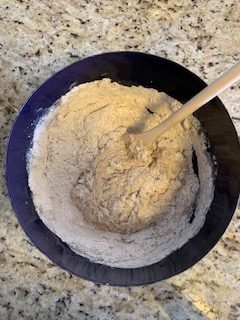
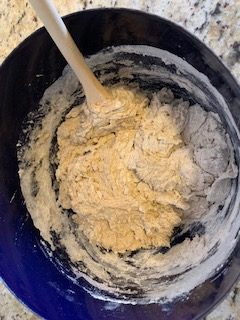
Add flour, about ¼ cup or less at a time, and continue to stir the dough until it becomes too difficult to stir with the spoon. It should be coming together into a ball by now.
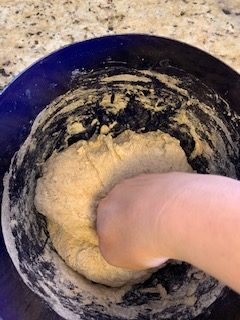
If you like the texture you have, you can skip this next step. Here’s where I diverge from most recipes by doing a bit of modified kneading. Sprinkle a bit of flour (about 2 T) over the still-sticky dough and then gently punch it down with your fist. Fold the dough roughly in half, sprinkle flour as necessary if it’s still sticking to your fist, and gently punch it down again. Repeat until the dough is only slightly tacky but not so dry it wouldn’t stick to you at all. If you find you’ve suddenly added too much flour, wet your hand that is working the dough and continue to work the dough until it gets back to the right consistency. Err on the side of wetter over drier.
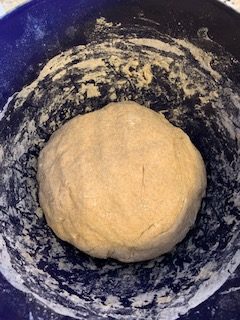
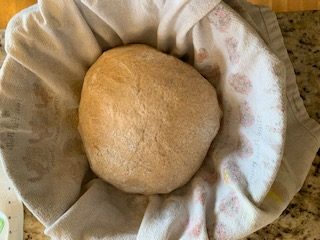
Form the dough into a ball with any seams facing downwards and cover loosely with plastic or beeswax wrap. Let sit for 15-18 hours.
Day Two: Get ready to do a final shaping and moving of your dough: set up a clean, lightly-floured surface and place your clean dishtowel into your proofing basket or narrow bowl.

If you have a bench scraper, you can use it or a rubber scraper to gently slide the bread out onto a lightly floured surface. It should be a bit tacky still.
Fold the dough in thirds, from either side into the middle, like you were trying to fold a standard-sized piece of paper to fit it into an envelope. Repeat 1-2 more times. This gives the dough some spring when it bakes.

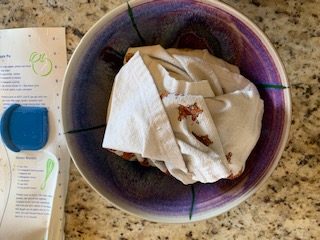
Place the dough, seam-side down, into the bowl or basket on top of the dishtowel. Wrap the dishtowel around the dough and twist the top so the dough is completely covered. Let it sit 1-2 hours (I have even gone up to 4 hours), for a final rise. The dough will do the most rising in the oven, so don’t worry if it doesn’t look much bigger than yesterday.
Preheat your oven to 500 F with your covered Dutch Oven inside of it. It’s best to do this about 30 min before you plan to use the oven so it heats evenly throughout.
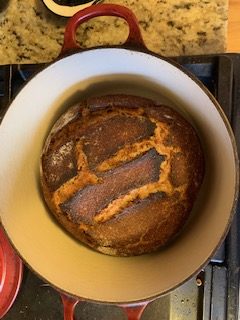
Set your bowl of dough right next to the oven. Things are going to move fast for this last push and it’s best to have everything ready. You want to lose as little heat as possible from the oven and the pot as you complete this part. Using oven mitts, remove the Dutch Oven and take off the lid. Quickly undo the towel and put the loaf top-side up onto your hand, flipping it carefully into the Dutch Oven so that the seamed-side is down again. You may choose to score the top at this point, but if you don’t want to (hot metal very close to your hands) or you forget (this is the most you’ve done at once relating to this bread today), it’s still going to turn out beautifully. Using oven mitts again, give the pot a shake to even out the dough’s placement in the pot, place the lid on the pot, and get that bread into the oven. (Wait, you say, how do I score the bread? Use a very sharp knife or a razor blade and slash a design on the top of the loaf with it. Popular shapes: an X, a square, 2-3 parallel or curvy lines… Why do this? It gives the loaf guidance on where to burst as it expands in the oven’s heat.)
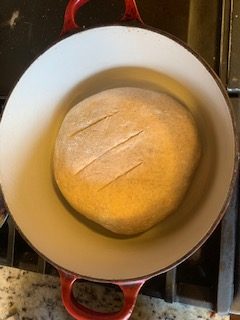
Turn the oven down immediately to 425 F. I sometimes do this before I even take the Dutch Oven out because I often forget in my mad rush to keep everything hot and get the dough into the oven. Bake the bread for 30 min.
Carefully and quickly remove the lid of the Dutch Oven and continue to bake the bread uncovered for another 30 min.
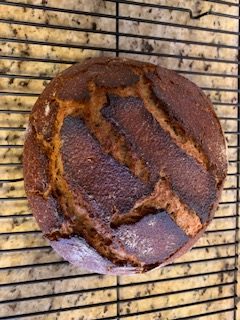
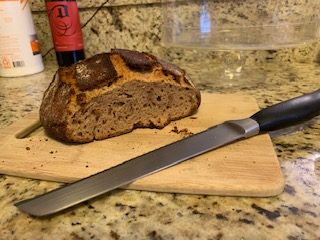
Dump the bread out onto a cooling rack. Thump the bottom by flicking it; it should sound hollow. Let the boule rest for at least 15 minutes before cutting into it.